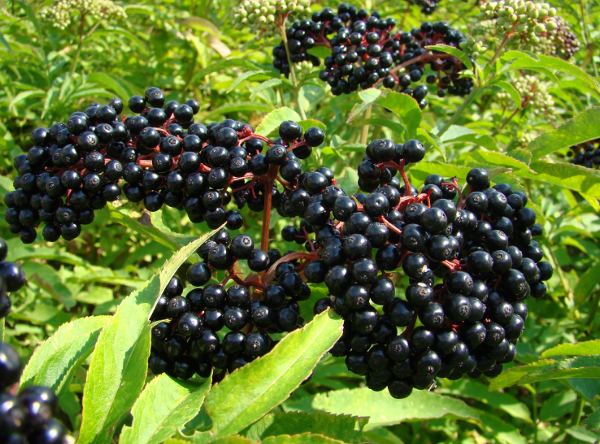
Common Elder (Sambucus nigra) is a familiar sight on railway embankments, urban waste ground, and in hedgerows. This small tree thrives in particular in the north and midlands of England, growing rapidly when cut back and giving off a discomforting dusty smell in the process, along with also being very difficult to dig up. The wood of the Elder is not good for burning either: it is lightweight and pithy, spitting and smoking as it burns rapidly. So, it is considered a weed, and when not ignored, it is usually disliked and cut back at every opportunity. But the Elder has attributes which explain its ubiquitous presence. The smell of its leaves tends to repel flies, and so historically trees were encouraged and planted around homes, stables and dairies for the protection that they provided against insect-borne diseases. Medicinally, Elder berries were also considered a cure-all, being particularly effective against colds, influenza and sore throats. I can’t comment on the scientific basis for this, but I can say that since I started making and drinking Elderberry wine I have stopped suffering from colds.

Common elder in flower.
There are lots of books that describe how to make home-brewed wine, and for many years I was put off by all the recommended equipment listed in their opening chapters. Most of this paraphernalia is unnecessary, and my method now is as efficient as I believe possible in terms of equipment, expenditure, time, and energy use; plus it gives me a 100% success rate. An initial outlay of at most £50 will buy all the equipment which is completely re-usable, takes up very little space, and will keep you in wine for life. The fruit to make the wine is freely available whether you live in an urban or country area, and with the cost of the other ingredients home-made wine comes out at about 50p per bottle. In addition to this, here are a couple more reasons to make your own wine:
1. Shop bought wine contains chemical compounds which are added for stabilising and preserving it (to give it longer shelf-like), and ensuring that it looks crystal clear when poured and standing in the glass. The additive that most people are familiar with is sulphur dioxide. If you ever get sneezes and/or an irritable little cough after drinking wine or cider, then this is likely your body’s response to sulphur dioxide.
2. Commercial winemaking is now a mechanised electrically-dependent industry. It is also responsible for large amounts of air miles taking these products to world markets.

De-stalked elderberries.
There are lots of different types of country wine that you can make, but in my opinion by far the nicest and best is that which is made from the berries of the Common Elder. Its taste is unique: very flavoursome and somewhat like the equivalent to a rich dark real ale. I have only ever seen Elderberry wine for sale once in a shop and its price per bottle was £12.
To make Elderberry wine you will need: two glass demi-johns (about £10 each although these can often be picked up for free outside bottle banks or cheaply in charity shops), five empty glass screw-topped wine bottles, two rubber bungs and air locks (usually bought together from a homebrew shop for about £4), a 1 metre piece of plastic tube (buy from a home-brew shop, about £2.50 – they often come with a sediment trap and small plastic tap insert, both of which are very useful), along with common household items such as a pan, jug, sieve, and spoon. In addition you will need these ingredients: 1 kg sugar (I use specialist brewing sugar as it is finer grained, although granular sugar will do), a level teaspoonful of wine yeast (but I’ve used bread yeast and the wine has been fine), and the fruit to give the wine taste (which you gather yourself).

Extracting juice.
The Elder tree doesn’t grow tall, so just a pair of scissors and a pan are needed to gather the berries required for your wine. The berries form in bundles on stems which droop as they ripen. Later on in the year, the stems wither and the berries become more juicy. This is when they are at their best, but they can be used beforehand. I continuously pick and bottle over a two month period from about August, and one mature tree will provide enough berries for about a fifty bottles of wine. Cut the berry bunches (enough to fill a 5 litre pan, which should be about twenty bunches) and catch them in the pan as they fall. The more you get the tastier the wine will be. All the fruit does is give the wine taste, the alcohol content comes from fermentation of sugar which is described below.

Sterilisation.
Although I have read that it doesn’t impair the wine if the stalks are left on, I de-stalk mine as the stripping process allows for the removal of any bugs or other things which you would probably consider best removed. Once de-stalked, rinse the berries in cold water a few times, which allows bits of stalk and floating debris to drain away.
Cover your de-stalked berries with water in a large saucepan; put the lid on and bring this to the boil. As soon as boiling occurs, turn the heat down and simmer for about ten minutes. Then turn the heat off completely, but keep the lid on and leave to stand for an hour or more. This is sufficient to soften the berries so that they easily yield up their juice. While the berries are in the pan, get a potato masher and mash them a few times. This is the “treading the grapes” equivalent of Elderberry wine, as it releases the juice into the water.

Wine fermenting in demi-john.
Before mixing the ingredients together, all equipment should be spotlessly clean, so sterilisation is important. I use sterilisation tablets for this (these are the things sold for cleaning baby bottles) as it’s easier and they are cheap, but boiling water could be used instead, and is probably more environmentally friendly. Once sterilised, make the wine as follows:
- Pour the 1kg of sugar into the demi-john. Don’t worry about the seemingly large quantity of sugar. All this will be fermented to alcohol, so that the finished wine will not be artificially sweet. It also preserves the wine.
- Stand the sieve over the jug and repeatedly pour the berry juice from the pan onto the sieve, so that the juice is strained and collected in the jug while the solid is captured on the sieve. Use the spoon to scrape any solid out of the sieve and discard it. Then pour the strained juice into the demi-john. With each input of juice, swish the demi-john around and the sugar will dissolve. Repeat this until all the juice is gone and mostly berry skin and seed is left in the pan. At this point pour more cold water into the pan and repeat the process.
- The juice/sugar mixture in the demi-john now needs to be topped up with fresh water so that it is just at the level where the neck begins to taper in.
- At some point during steps 3 and 4 the yeast needs to be mixed in too. Just sprinkle it in. But, it is important not to do it with the first few additions of juice from the pan as the water may be too hot and it could kill the yeast.
- Put the rubber bung on the demi-john, add a little bit of water into the plastic air-lock, and slot this into the rubber bung.
- The wine making process is now finished. The demi-john should be left alone for about three weeks. It will work and bubble away well if the temperature is anywhere between about 12°C to 30°C, so room temperature range.
- You will know when the fermentation process is finished because the brew will have stopped bubbling. The rate of bubbling will peak (after about five days) and it will then gradually slow down, but leave it to keep going though until it has stopped completely (about three weeks – but this depends of the storage temperature). Once this is done, you have wine. But there is one more thing left to do, and this is where the second demi-john comes in.
- The wine needs transferring into the second demi-john (to separate the liquid from any dregs that collect at the bottom) using the piece of tubing. Sterilise these items before commencing. To syphon the wine into the second demi-john, site the empty demi-john below the first, remove the air lock from the first demi-john, insert the tube, and syphon the contents across. Once done, put an airlock on it. Elder berries make a particularly clean wine and there will be hardly any dregs at the bottom just a red powdery reside. If some of this comes through the tube, it is absolutely fine because firstly it is not harmful and secondly you’ll be syphoning it off again into bottles.
- Leave the mixture (in the second demi-john with bung and air-lock attached) for a few more days to settle (a cooler place is better, but it doesn’t matter if it stays in the room where it was fermenting). And while settling clean up the first demi-john and get another batch going!
- After a few days, bottle the wine. Sterilise the bottles (and screw caps), then syphon the wine across. That is it. The wine will now keep until you want to drink it.

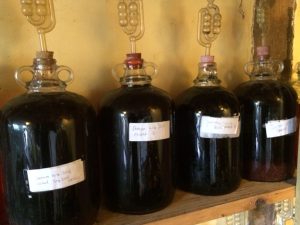
One year’s harvest.
As you get experienced, you might want to try other flavours. If you initially stick to soft fruit the process will be simpler, as described above. Other wines to try are blackberry, redcurrant and blackcurrant. Root vegetables and other fibrous/pithy materials will need a straining stage in the process. One alternative is to pick the Elder flowers before the berries form as they make a champagne-like brew, plus they contain their own yeast, so it is just a matter of adding water and sugar then off the fermentation process will go. But of course, you’ll miss out on the berry wine if you do this!

6 Comments
the blossoms dried make a nice tasting tea that heals colds and fevers!
Is the Common Elder also the best tree to use for Elderflower wine/cordial?
Yes – this is about the wild elder, and I think there’s only one wild species. Somebody correct me if I’m wrong.
Yes. Common Elder (Sambucus nigra): https://www.rhs.org.uk/Plants/16391/Sambucus-nigra/Details
Berries should just now be ripening.
Andrew
Since writing this blog I have been occasionally researching the historical evidence of elderberry wine’s medicinal properties. I have found numerous references to support that it was widely used. In the book “Woodland Crafts in Britain” by H.L.Edlin (1974), the author describes how in the mid-19th Century whole orchards of elder were grown around London to meet the demand for elderberry wine. If someone has any more information on this would they please contact me?
Andrew
Yes! We must respect our elders! 😀
I’ve several named varieites – Black Lace, Hashberg, and Haidegg 13. I’m waiting for the sambucus canadensis York to grow a bit more, I hope it takes off. Looking forward to seeing the difference between the varieities – the vigour, habit and of course flavour of the flowers and fruit. They’re growing alongside wild varieities in my garden. Still, I haven’t yet managed to have enough elderberry tincture to see the whole family through the winter. Maybe next year…
And I’m propagating more elders for others, with Earthed Up! edible and useful plants. If you’re interested, be in touch via our profile in the directory.