We learn from our resident retained heat cooking specialists Jane and Seggy Segaran about how to build an off-grid solar slow cooker.
We have been experimenting with solar and haybox cookers for some time. When discussing solar cooking the objections that come up are: How does one cook in the evenings or on cloudy days? For this reason we decided to explore an option of a slow cooker powered by a battery which has been charged by a solar panel.
Some background
The cooker was to use a heating element driven from a 12V battery and a power rating around 50 watts. At this low power rating it was possible to use a solar panel and battery arrangement and avoid having to use 230V (or 110V) mains voltages.

Our first task was to find a suitable heating element and was surprised to find one quickly on E-Bay. It was priced at £15 ($22). All one had to do was to connect it directly to a 12V supply and it was waterproof – an essential requirement inside a cooker. In air they will settle at a temperature of approx 160 to 170C. The waterproof covering can handle a maximum temperature of approx 220C. After some experimentation we settled on the 90 watt one. This took around 7 amps of current from a 12V battery.
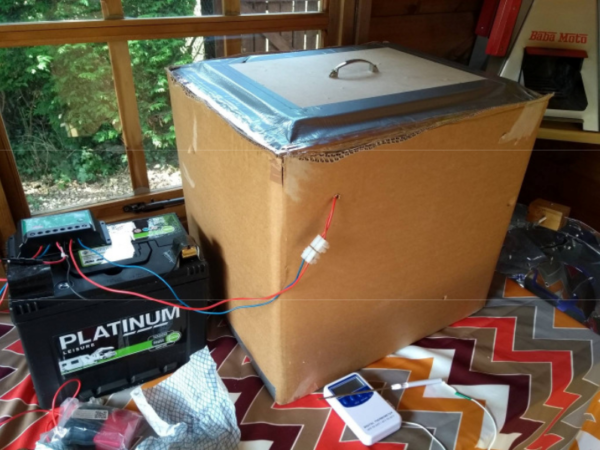
Then we invested in a 100W solar panel (£100) and a 10 Amp charge controller (£10). When connecting up a solar panel to a battery and a load using a charge controller is essential. They are easy to wire up and prevents the battery from over charging. They also prevent the battery from discharging through the panel at night. Finally when driving a load, the charge controller prevents batteries from going completely flat as this can damage it. The image above shows how easy it is to wire this up.

The last investment was a 75 Ah leisure battery at a cost of £55. Leisure batteries are different from car batteries in that they are meant to be charged and discharged many times. The main precaution to take with batteries is to prevent accidental shorting as this can result in a fire. The best way to avoid this is to fit a fuse very close to the positive terminal.
Now for some maths…
A fully charged 75Ah battery can supply 7 amps for just over 10 hours. The Ah stands for Ampere Hours i.e. current multiplied by time in hours. The heating pad takes 7 Amps and with a 12V battery the power is 84 watts i.e. current multiplied by voltage. Our experiments showed that not all this power ended up in cooking the food – only about 40 to 60 watts.
A 100 W solar panel can provide a peak power of 70 to 80 Watts. If it is in a fixed orientation (and does not track the sun) then my estimate was 50 watts average power over a 6 hour period. 50 watts means a current of around 4 Amps going into a 12 V battery. So to fully charge a 75 Ah battery is going to take around 20 hours – or just over 3 days. So 3 days of charging will provide 10 hours of cooking. The battery acts as a reservoir charging from the sun and discharging into the heating pad as required so it’s never fully charged or fully discharged (unless we have many days without sun).
Solar cooking with stored energy
Unlike conventional slow cookers which use around 300 watts this one had to run at a power of 50 to 60 watts so required max insulation. We constructed one by using 70 mm thick insulation all round and this gave good results. This was made up of 50 mm of Kingspan type insulation and 20 mm of cardboard packaging sandwiched together. We used kitchen aluminium foil to line the insulation together and held it in place with aluminium tape.

The rubber pad sat on a piece of bent metal to hold it off the base of the cooker. When baking, the tray sat on top of the rubber heating pad. This means that the base of the tray can get quite hot and burn the cookies – so it was necessary to turn these over part way through. Once the baking tray has warmed up it took around 30 minutes per batch.

We also added a re-settable thermal fuse in series with the heating pad – this was rated at 120 degrees centigrade and helped regulate the temperature. The image below is in the garden shed where the cooking is taking place just with a 90 watt heating pad driven by a 12V battery.

A 3-container Tiffin like the one shown here can help greatly when using this slow cooker. Here you can see onions, courgettes and aubergines being cooked separately before being combined in a curry. We have also successfully cooked rice (around 1 hour for 2 portions) and curry (around 1.5 hours for 2 portions) in this off-grid slow cooker.


If you are building a cooker or thinking about it, please don’t hesitate to ask us for assistance as to where to buy components or recipes.

About the authors
Jane and Seggy Segaran have been involved for many years with low-energy cooking techniques. Having tinkered with solar cooking and rocket stoves, their main focus is now haybox cooking. Their publication Haybox Cooking is available for sale and part of the proceeds go towards funding educational projects on fireless cookers in East Africa.

4 Comments
Could you give me some advice on buying solar panels and battery to save energy also any advice on wind powered energy. Looking to produce enough energy for a log cabin with all facilities and 3 barns and 4 stables?
Hoping you can help!
Hi Kirsteen. See here – https://www.lowimpact.org/lowimpact-topic/solar-electricity/ and here – https://www.lowimpact.org/lowimpact-topic/wind-generators/. Tons of info, and you can ask specific questions at the bottom.
I Believe the silicone heating element is a great idea to use on Crockpot or instapot for cooking with the PowerOak PS5B-400Wh lithium-ion generator. This may help reduce my battery consumption instead of using the inverter from 12v dc to 110V ac.
Interesting to note that somebody else has discovered the Haybox. Something that is so simple and cheap to operate I’m amazed that others have little idea about them – I built my own some five years ago and it gets regular use, especially in winter, cooking up curries and stews just sat there doing very little other than just holding heat in.
Mine is a simple homebuilt wooden box with half inch walls inside and out, sandwiching some two inches of vermiculite as the insulating material. In addition I have two canvas 2 inch thick bags top and bottom (the insulation in there is a couple of ‘retired’ pillows). The Casserole dedicated to this system just fits inside. Prepare and cook the dish on the top of the stove for about one third of the required cooking time (often less – I’ve got away with some 20 minutes at a push) then into the box with the bags top and bottome, lid clipped down and leave . . . . it will still be warm and cooking often longer than three to four hours.
Please feel free to use this information anyway you wish and save energy, happy cooking