In Part 3 of The Mushroom Guide, Benedict Noel enjoys the fruits of his labour harvesting shiitake mushroom blocks, as he continues his step-by-step tutorial.
Catch up with Part 1 and Part 2 first, if you missed them.
Harvesting
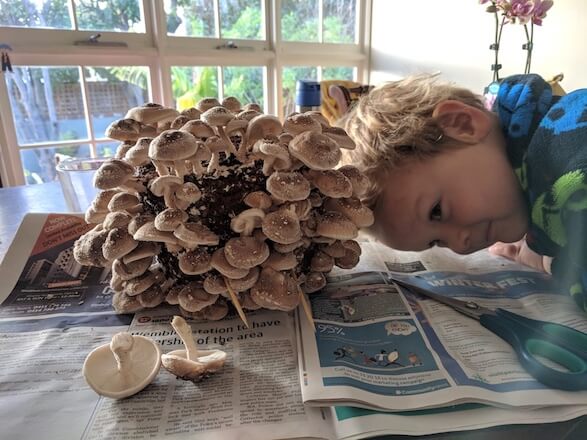
Harvesting shiitake mushrooms is fairly easy. I generally harvest all the mushrooms in a single session, unless there are clearly two pin sets at different stages of growth. I’ll get the block, put it on a piece of newspaper and then cut the top mushrooms off the top of it with scissors. After doing this, I’ll turn the block upside down as I find it quicker to harvest the mushrooms from the underside. You can use a knife, or even twist the mushrooms off. I find that twisting them off often rips large chunks of sawdust with it and this means extra clean up. If I’m harvesting for myself, and I’m not going to use the stalks, I’ll just cut the heads off the mushrooms and leave the stalks on the block. No point doing extra cutting in the kitchen!
Second flushes
Most of the time I don’t bother trying to get a second flush of mushrooms from shiitake. This is because the yield will be fairly low if your first flush is large. If your first flush is small, or you want to maximise yields, do the following:
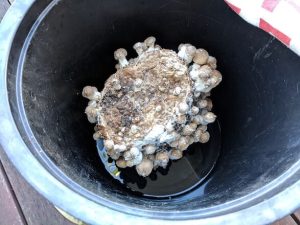
When you’ve picked the mushrooms from your first harvest, leave the block somewhere to dry out that has good airflow (e.g. on a shelf with a rack). You’re trying to prevent the outside of the block from going mouldy. After 3-4 weeks the block should be very dry. Submerge it in water for approximately 12 hours. One way to do this is to fill a bucket with water, submerge the block in it and place bricks or weights on top to hold it under water. The idea is to hydrate the block so that it gets wet, but not so wet that it falls apart. Take the block out of the water, hit it on each side again (not too hard as this time as it doesn’t have the bag to hold it together) and put it back in your fruiting container. Repeat the misting routine – there’s no need to put it in the fridge this time.
Disposing of the block
Your shiitake log is completely organic, so you can compost it, bury it or add it to your worm farm. Worms love mushroom mycelium, they’ll tear your block apart it a few days.
Dealing with problems
The two biggest problems you’re likely to face are that your block will go mouldy or you won’t get many mushrooms. If your block is going mouldy, it’s too wet and potentially doesn’t have enough airflow. If you’re not getting a good yield, it’s likely the block is too dry and you need to increase humidity by misting it more. It takes a little bit of experience to know what looks right, so if you’re unsure it’s better to err on the side of keeping the block a bit drier. It’s better to get less mushrooms than no mushrooms at all!
Next time, we’ll be taking a closer look at preparing the all important fruiting substrate, so do stay tuned.
Based on an original post available here by Benedict Noel at The Mushroom Guide.
 About the author
The Mushroom Guide is written by Benedict Noel from Perth, Western Australia. He’s been hooked on mushroom growing since watching this TED talk in 2015 and has been building his knowledge and experience ever since. Since starting out, he’s helped run a couple of cultivation courses, given presentations at festivals and grown a wide variety of mushrooms, from oyster and shiitake to pioppino and chestnut.


