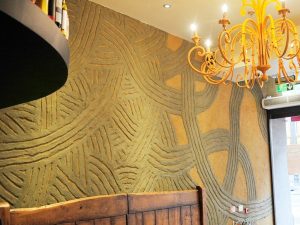
Thanks to Sigi Koko of Build Naturally.

Plasters made with clay are beautiful, durable, and made from inexpensive and non-toxic ingredients. Clay creates a breathable finish material with a natural capacity to regulate moisture and temperature in the surrounding air. Clay naturally absorbs excess moisture in the air, helping air to feel more comfortable in summer, while its high thermal mass creates a battery heat (or cooling) storage that helps to maintain constant air temperature. Materials can often be found on or local to the building site, making the ingredients dirt cheap…literally. Or you can use dry bagged clay from a pottery supplier. Clay naturally occurs in a variety of colors and clay plasters can be pigmented with mineral based pigments in every range of color. Techniques for mixing and applying are simple and the plaster is extremely forgiving, even for beginners of any age.
Drywall Preparation
Sanded primer for drywall application of clay paints (from Keely Meagan’s article in The Last Straw)
- 10 parts wheat paste
- 1 part fine sand (such as mason’s sand)
- 1 part clay
Mix together & paint on wall. Allow to dry completely. Do not re-wet wall surface prior to plaster application.
Covers approx. 40 SF
Wheat Paste
Bring 1 quart water to boil in a non-aluminum pot. Meanwhile, mix 1 cup flour with 1 cup cold water until smooth and lump free. (If you can’t get it lump free, run through a strainer.) When water in pot is boiling, slowly add in flour/water mixture, stirring constantly. Bring back to almost a boil, stirring constantly, until mixture thickens. Remove from heat and allow to cool completely. Use wheat paste within a day or two; it goes rancid after a few days (faster in warm weather), and becomes smelly and usable.
Makes approx. 5 cups of wheat paste.
Clay-Over-Clay Preparation
Dampen clay substrates prior to application of clay paints or plasters. I recommend dampening clay substrates the evening prior to application, again in the morning before you begin to mix your material, and then again about 20 minutes prior to application. Thick cob walls generally require more dampening than clay plaster surfaces. Be sure to allow your water to completely absorb or you will create a water slick that prevents plaster from adhering to your substrate. Continue to dampen the wall as you work.
Kaolin Clay Plaster
beautiful white or off-white, creamy plaster that can be pigmented as desired
- 1 gallon water
- 1 (5)-gallon bucket kaolin clay putty*
- 2-½ (5)-gallon buckets fine sand**
- 1 cup wheat paste per 5-gallon bucket of material (clay and sand)
- Pigment, mica, or chopped straw, as desired
*to make clay putty, soak dry, bagged kaolin clay powder in clean water for a minimum of 24 hours until it is the consistency of sour cream; store in a cool, dry place; kaolin clays are white to off-white, but you can substitute any bagged clay in this recipe in your color of choice
**typical is mason’s sand though finer grit sand may be used; the finer the sand, the smoother the wall surface without buffing with a finish trowel
- Mix all ingredients together thoroughly. You can use a cement mixer or you can mix materials on a tarp (flipping often & mixing with your feet). Final consistency should resemble creamy mousse. More water may be added to achieve desired consistency.
- If adding pigment, save some pigmented plaster with no wheat paste for later patches or repairs. Add wheat paste after pigment.
- Apply plaster to desired texture, typically using trowels, onto substrate that has been prepared as above.
- When leather hard (slightly firm), smooth the surface by buffing with a damp tile sponge, rinsing the sponge frequently. Or, for a super smooth finish, run a final sweep across the dampened surface with a very flexible trowel. Mist clay surface slightly as desired as you buff with the flexible trowel.
Covers approx. 100 SF

