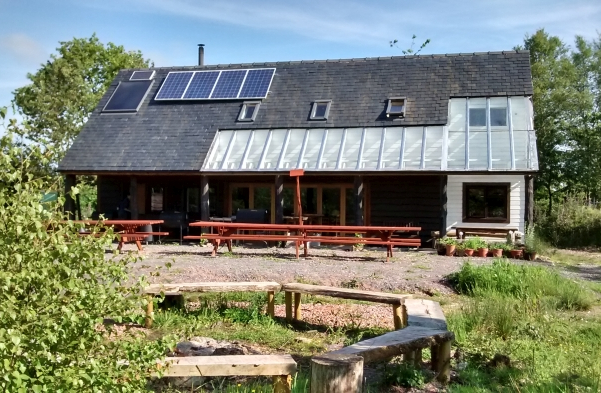
Two years ago, we blogged about Anna and Pete’s experience in obtaining planning permission for a self-built, off-grid home in the woods in Devon. Here’s the story of what they built and how they power and heat it.
In 2012 we were granted planning permission to build a house. The planning permission demanded that the house was completed and our caravans moved off the land within 18 months. This would have been a challenge for experienced builders. Our previous building experience was a shed, a barn and a couple of compost toilets. As such we had no real reference point for how much work was involved. In some ways this was a good thing as it meant that we were not as daunted as we would have been. We got someone in to do the groundworks and for legal reasons there was some plumbing and electrical work that we couldn’t do ourselves, but other than that the house was built by Anna and myself with help from friends who mainly knew nothing more about building than we did.
Our first step was to go to the library. There were a number of books on self-build. We took a few out, went home and started to read. We were dismayed to find that they all started with a chapter on how to choose a good architect and project manager or whether you should get the architect to project manage for you. Then some went on to tackle the idea that you might project manage yourself. To enable you to do so, they had hints on how to find good tradespeople to do the work involved in the build. It was abundantly clear that these books were not written for us.
So we looked on the internet and found amongst the endless reams of advertising and useless junk- some really useful information. A lot of it from America, Canada and Australia where it is not unknown for people to build their own houses. We also found just enough British information to make it work with the materials and techniques used in this country.
We had been forming the design of the house in our heads ever since we moved on to the land. Because we had lived there for years and seen the sun rise and set each day and watched the view change through the seasons we had clear ideas of how the house would fit into it’s surroundings.

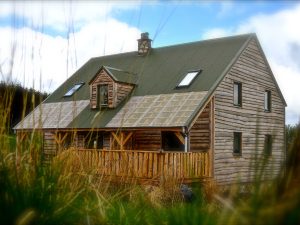
We wanted a veranda on the south side so that we could sit outside whilst being sheltered from the rain and patio doors leading onto the veranda so that there is a gradual transition between the interior of the house and the woodland it sits in.
The ground floor layout is almost identical to a plan that we drew in our first winter in the woods in 2009-2010 when we were trying to keep our spirits up whilst living in a caravan during the coldest winter in 35 years. At that point we were planning to build a bungalow. We wanted the roof to be at 45° for solar panels and when we came to draw up rough elevations of the house we realised that the roof was massive. We could have made the south side of the roof 45° and had the north side at a much gentler angle, but we thought that this would look a bit odd so we stuck with the big roof and put rooms in it, thereby doubling the size of the interior. Looking back we’re glad we did, but it did add a lot more work.
We started our part of the build in June 2013. The frame for the ground floor went up in no time and the house started to take shape. Fired up with enthusiasm we worked crazy long days building the house and running the charcoal business in the first “barbecue summer” since we had started selling the stuff. It was probably good that we didn’t realise what a small part of the build that frame was.

Part of the ground floor frame is a post and beam frame which holds up the roof over the veranda. This is made from some oak trees which came down in a storm in 1992. All of the sap wood had rotted off just leaving the heartwood which is immensely tough. We don’t have the woodworking skills to do proper joints without risking getting them wrong and ruining the beams so we got a friend of ours to make up metal brackets which we had designed. These were fixed into the posts by making a chainsaw cut vertically into the top of each post to slide the bracket into. The brackets are then bolted onto the beams.

We then moved onto the roof structure. We could have bought roof trusses ready made and had them lifted into place with a crane, but to save money we made them ourselves on top of the ground floor frame. They were fixed together with nail plates. In all we used about 20,000 nails. That’s a lot of hammering. When we had fixed the nail plates on one side we had to flip each truss over to nail plate the other side. The trusses each weighed about a quarter of a ton and we had to do this whilst balancing on the ground floor frame. We then had to stack the trusses on top of each other so that there was enough space to make them all and finally move them into place and secure them. So then we were ready to start slating the roof. Slating took more research than any other part of the build. There are many different sizes of slate and you have to work out what headlap (overlap) is required depending on the size of the slate, the pitch of the roof and how exposed the roof is. There are also many types of slate: real slates and composite slates, Welsh, Cornish, Spanish, Brazilian or Chinese slates, various thickness’s and grades of slate.
In an ideal world we would have bought Cornish or Welsh slate but the cost is prohibitive. The cheapest slates are Chinese followed by Brazilian. But these have 10 and 5 times the carbon footprint of Spanish slates respectively and do not have the same environmental controls over production methods. We found some Spanish slates that were described as “rustic” because they do not have an even finish and are of varied thickness. They also contain pyrite which means that they will discolour and rust over time but not in quantities that would cause structural problems. As these slates are seconds, they were cheap enough for us to afford. They are starting to discolour now and they do look rustic but that just fits in with the overall look of the house which looks homemade because we made it.
When we finished the roof we celebrated in the traditional style with a bottle of bubbly, partly because we hadn’t fallen off and didn’t have to work at that height anymore (we couldn’t afford proper scaffolding and had done the whole thing off a scaffold tower) and partly because we believed that now that we were working on the interior we were on the home run.

Whoever knew how much work is involved in the interior of a house? Eventually after months of carpentry, plasterboarding and eventually painting we were able to move in just as our caravan finally sprung a leak above our bed. We were a little over the 18 months that we had been allowed to do the build but the planners could see that we were doing our best.
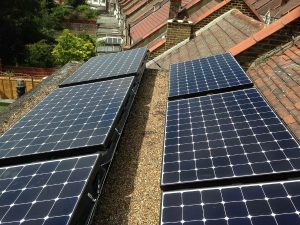
The house fits in well with our sustainable ethos. It is off grid and the electricity is provided by 960w of solar panels. The electrics are all on a 24v DC system. This would not be suitable if it was a large system but it saves the inefficiencies of using an inverter when most of the appliances that we use, use a DC supply. Waste water is dealt with by a reed bed system and the reeds will be harvested to make compost with.
Heating in the house is partly provided by a woodburner and partly by solar energy. It is a revelation to us to have a living space that stays warm overnight without keeping the woodbuner alight. We also now have the luxury of underfloor heating. When someone suggested underfloor-heating to us we thought that it was a desirable but expensive luxury. When we realised that as we were building from scratch and putting a screed floor in, it was as cheap as radiators, we went for it.
Although we do have a debt against the house, because we built it ourselves rather than paying builders we built it on a very tight budget. The repayments on the debt are vastly less than the rent that we used to pay before we moved into the woods. The house has been designed to be cheap to live in thereby assisting us in our economic sustainability. Most of all after 5 years of living in a caravan and a bit over 18 months of building it is lovely to have a warm and comfortable house to live in.


6 Comments
Amazing inspiration. Thanks for writing this. I’d love to visit!
My kind of dream home.
Thank you for you writing, how difficult was it to get planning in the first place. Thank you
That was the hard part. 3 years of proving that our business was viable and required us to live there. There’s some notes about our approach on lowimpact.org if you search or at http://www.bulworthyproject.org.uk/planning
Have you written anywhere else in more detail of the heating, power and water? Interested how the 24V system powers 12v things and how the u/floor piping is connected to the stove and how you manage with power in winter when light levels are low and you need the most power.
Well done for getting planning permission from the council in Devon ihave an eco friendly holiday home in Devon but it’s a much lower key affair . I applied for planning but got refused so I built it anyway but I wouldn’t encourage others to go the same way as I,be had a lot of hassle from the council. How do you get on sleeping there at night ? At first I found it really scary cause I was on my own there were other people around during the day but none of them stay there at night. When I first heard owls hooting and pheasants calling and rustlings in the place I had a job to sleep but now i,be got use to it.